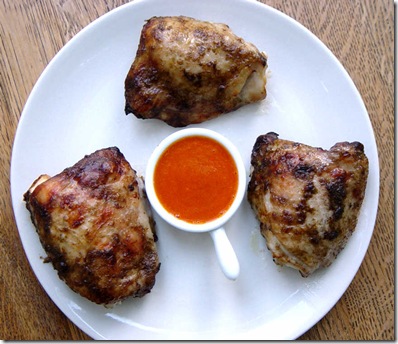
Wednesday, 10 April 2013

Aromatic Lamb with Dried Apricots

Although I'm the homeliest of home cooks, every now and  then I get an urge to recreate something that I've eaten in a restaurant and today is one of those occasions. This dish probably started out long ago as a traditional Parsi dish but by the time that I came across it in a south London restaurant it had been adapted to British tastes and to restaurant cooking. Sadly, I didn't get the recipe at the time and the restaurant is long gone now. In my attempts to recreate the dish I've used some decidedly inauthentic ingredients. But who cares? It works.

The dried fruit brings a lovely sweetness to the dish while the spices add both depth of flavour and fragrance. There are a lot of ingredients listed, but it’s actually pretty easy to put together. If you can, allow yourself enough time for the overnight marinade – it really does make a difference.

The dish is fine on its own but it would also sit well alongside a vegetable curry or you could serve it with rice if you happen to be really hungry. A simple chutney would also be good – lemon chutney would be ideal. It should serve two fairly generously.
Aromatic Lamb with Dried Apricots
275 g trimmed lamb neck fillet, cut into chunks of about 3 cm
1 onion, finely chopped
3 cm (or thereabouts) fresh ginger, peeled and very finely chopped
1 tbsp tomato purée
8 dried apricots, cut in half
1 tbsp raisins
Seeds of 3 green cardamom pods, crushed
¼ tsp fennel seeds, crushed
2 tbsp ground almonds
Steamed or boiled new potatoes
A dash of lemon juice
Coriander leaves, roughly chopped

For the marinade:
     1 tsp paprika
     1 tsp cumin, ground
     1 tsp coriander seeds, ground
     Seeds of 1 black cardamom pod, crushed
     ½ tsp black pepper
     1 large clove garlic, crushed
     30 ml balsamic vinegar (a cheap but not nasty one is fine)
     30 ml red wine
     1 tbsp palm sugar (use brown sugar if you don’t have palm)

Mix together all the marinade ingredients in a non-reactive bowl, add the lamb, cover and leave in the fridge overnight (or for a few hours, if you’re in a hurry).

The next day, sweat the onion in a little oil over a low heat for at least 10 minutes. Add the ginger and continue cooking for another 5 minutes. Add the lamb and the marinade and stir in the tomato purée. Pour in water until the lamb is almost covered, bring to a simmer, cover the pan and let it cook very gently for an hour. Stir now and then and top up the water if it starts to dry out.

After an hour, add the apricots and raisins. Stir in the cardamom and fennel seeds and the ground almonds. Season with a little salt. Cover the pan loosely and continue cooking for another half an hour. The sauce should be quite thick – if it seems too thin, then remove the lid during this last half hour but, on the other hand, add a little water if it seems too dry. Stir in as many cooked new potatoes as you fancy for the final 15 minutes or so.

Once the cooking is complete, stir in a dash of lemon juice to freshen the taste, add a little more salt if it needs it and sprinkle with the coriander leaves just before serving.

Wednesday, 27 March 2013

Grapefruit Yogurt Cake

This is a classic and simple way of making a cake that turns up with minor variations in quite a few different countries. I first came across it in France where it often seems to be the first cake that children are taught to make because it’s easy, very forgiving and there’s no weighing needed.

For this month’s Random Recipe challenge Dom of Belleau Kitchen has asked us to select from our cuttings, clippings and old hand-written recipes. I'm very happy to do that – in fact, I should do it more often. Reaching into the magic cupboard containing my ‘library’ I came up with a notebook containing a mixture of hand-written and torn-out recipes dating from the 1990s. From that I randomly selected this yogurt cake, or I should really say ‘gateau au yaourt’ since it’s taken from a French magazine (although I'm not sure which one).

Lemon or lime is more commonly used to flavour this cake, but grapefruit is actually a very pleasant change. I have to confess to making two minor changes to the recipe. I added the grapefruit liqueur because I just love the stuff – it’s entirely optional. I also reduced the amount of sugar a little. Classically, the ratio used for the cake is one pot of yogurt, two pots of sugar and three pots of flour but, although that’s easy to remember, I think it’s a bit too sweet.

I used a plain, full-fat yogurt for this cake, but flavoured yogurts will work well. It’s also possible to use low-fat yogurt, provided that it’s not too thin – you will lose a little richness in the finished cake, though. Although I didn't add one this time, it’s quite common to make a syrup to drizzle over the cake, especially if you’re using it as a dessert.
Grapefruit Yogurt Cake
1 pot plain yogurt, 150 g (see note above)
2 eggs
1½ yogurt pots of caster sugar
3 yogurt pots of plain flour, sifted
2 tsp baking powder
½ yogurt pot of sunflower (or other neutral oil)
Zest of 1 small grapefruit
1 tbsp grapefruit liqueur

Preheat the oven to 180°C. Butter and line a cake tin. I followed the French instructions and used a 22 cm cake tin, which produces a relatively thin cake. If you’d prefer a taller, more British cake, then use a smaller tin – around 20 cm should be fine.

Place the yogurt in a bowl. Wash out and dry the yogurt pot to use as a measure for the other ingredients. Whisk the eggs into the yogurt one at a time.

Once the eggs are combined, whisk in the sugar followed by the flour. It’s best to add the flour gradually to ensure that you don’t get any lumps in the mixture. It’s important to combine everything well but don’t overdo the whisking at this stage.

Gradually pour in the oil while continuing to whisk gently. Finally, stir in the grapefruit zest and liqueur.

Pour the finished mixture into the prepared cake tin and bake for around 35 minutes or until a knife-point inserted into the centre comes out clean.

You have to admit, that's a pretty easy cake. En effet, c'est du gâteau.

Wednesday, 20 March 2013

Debden Chocolate Pudding

If you've not come across this little pudding before, then you might think that the recipe sounds ridiculous. Well, it is a bit odd, but it does works, honest. It’s one of those puddings that separates out during cooking. You should end up with three layers: a crunchy sweet topping, a chocolate sponge middle and a chocolate fudgey base.  It’s indulgent and delicious without being too ridiculously high in fat. What’s not to like there?

This month’s We Should Cocoa challenge is being hosted by Lucy over at The Kitchen Maid and she’s asked us to share a famous chocolate recipe.  Well this one’s famous. Or, at least, it used to be famous. Around the early to mid 1980s this dish seemed to turn up everywhere. OK, it’s old-fashioned and it’s not photogenic but it’s also delicious and it definitely doesn't deserve to be forgotten.

I really don’t know the origins of this dish. When I first came across it in the 1970s I’m pretty sure that I was told it was named after the place in Essex. Later someone told me that it was named after a Mrs or Mr Debden. More recently I found that there’s a similar American dish called Denver pudding. As usual, I'm confused.

You can eat Debden pudding warm or chilled but it’s at its best when served at room temperature, I think. A little cream, ice cream or thick yogurt would be a nice addition. This should serve 6 – although, frankly I could eat the whole thing myself.
Debden Pudding
120 g plain flour
2 tsp baking powder
170 g granulated sugar (ideally the golden, unrefined type)
30 g unsalted butter
40 g dark chocolate
140 ml milk (preferably full-fat, although semi-skimmed will work)
50 g demerara sugar
50 g caster sugar
20 g cocoa powder
175 ml cold water

You’ll need an ovenproof dish that will hold at least 900 ml. Butter the dish. Preheat the oven to 170°C.

Mix together the flour, the baking powder and the granulated sugar. Melt the butter and chocolate together over a bowl of simmering water or in the microwave. Stir the butter and chocolate mixture into the flour and sugar, followed by the milk. The mixture won’t look promising at this stage, but don’t worry – trust me, I’m a blogger.

Pour the mixture into the prepared dish. Sprinkle the demerara sugar evenly over the mixture in the dish. Do the same with the caster sugar and, finally, with the cocoa powder. Now carefully pour in the cold water, trying to avoid disturbing the layers of sugar and cocoa as far as possible.

Place in the oven and bake for 40 – 50 minutes until the top has formed a crust. (The type of dish you use is likely to make a difference to the cooking time. The old-fashioned enamel tins are probably the quickest.) Allow the pudding to cool before serving. If you’re not planning to eat the pudding immediately, then store it in the fridge, but preferably return it to room temperature before serving.

The We Should Cocoa challenge was created by Choclette at Chocolate Log Blog and Chele at Chocolate Teapot.

Wednesday, 13 March 2013

Palets de Dames

Gaze into the window of a boulangerie in the north of France and there’s a chance that you’ll spot some palets de dames.  Gaze into a number of boulangerie windows, though, and you might notice that the palets look very different.  They’re a pleasing little treat that’s somewhere between a cake and a biscuit but sometimes they have a smooth covering of fondant icing, sometimes no icing  at all and sometimes they contain currants or candied peel. Well, my version has a coating of apricot jam and a thin, lemony icing. I don’t really know if that’s authentic but it’s a recreation of the first palets that I ever came across while wandering around the Baie de Somme.
Baie de Somme
If you’re unfamiliar with the Baie de Somme, then I’d describe it as an area of spectacularly large and rapid tides, seabirds, seals, fine seafood,  salicorne (samphire), salt marsh lamb and some excellent baking among many other things. Happily for me, it’s also not all that far from the south of England.
Palets De Dames
Incidentally, they’re called palets de dames because ‘jeu de dames’ is French for the game of draughts (or checkers, if you’re not British). I've only ever seen white icing being used, though, so it might be a one-sided game.

For the palets:
     130 g unsalted butter, softened
     130 g icing sugar, sifted
     2 eggs, lightly beaten
     150 g plain flour, sifted
     75 g ground almonds
     Apricot jam

For the icing:
     225 g icing sugar
     1 tbsp lemon juice
     4 or 5 tbsp water

Preheat the oven to 170°C. Beat the butter briefly, then add the icing sugar and continue beating until light in colour and very smooth. Gradually add the eggs while continuing to beat the mixture. Stir in the flour, followed by the ground almonds. The flour and ground almonds need to be thoroughly combined, but don’t overwork the mixture at this stage.

Line a couple of oven trays with baking parchment or silicone sheets. If you want a regular and nicely rounded finish on the palets then you could pipe the mixture onto the baking trays in neat circles. That’s what a true patissière would do, I'm sure. On the other hand, if you don’t mind a touch of irregularity, then simply spoon small piles of the mixture onto the lined trays and flatten them a little with the back of the spoon. The amount here will make around 16 decent sized palets but you could make them smaller if you wished. Space the palets out to allow them to spread while baking.

Bake in the preheated oven for around 10 minutes. The palets should feel fairly springy to the touch, should have a light golden colour around the edge but should remain pale in the centre. Cool on a wire rack.

Once cool, spread the tops with some apricot jam. This will be easier if the jam is warmed a little first, but allow the jam to cool before adding the icing. Prepare the icing by mixing together the icing sugar, the lemon juice and enough water to produce a fairly thin but not too watery icing. Spread the icing over the palets, being careful to avoid disturbing the apricot jam layer too much. Allow the icing to set  before enjoying with your favourite beverage. Store in an airtight container.

Tea Time Treats is a blogging challenge created by Lavender and Lovage and What Kate Baked and this month's challenge, hosted by Lavender and Lovage, is for French treats. So that's completely within my comfort zone and I can't resist entering this little effort.

Saturday, 23 February 2013

This Is Not A Gâteau Creusois

Today we make another stop on my annoyingly long tour de cakes de France and find ourselves in the Creuse. The Creuse is a lovely region, although the last time I was there it was around this time of the year and it was really cold. Anyway, it’s there that you’re likely to find examples of a gâteau called ‘Le Creusois’ on sale.

It’s also possible that you’ll find several similar cakes under slightly different names in French supermarkets, as well as a number of versions of gâteau Creusois recipes which people will tell you are the real, authentic recipe that their grand-mère made. They may well be authentic and ancient recipes – I have nothing but the greatest respect for grand-mères – but the particular cake sold as ‘Le Creusois’ was actually born shortly after the Beatles gave their last performance on the Apple roof in 1969. It appears that the gâteau was inspired by a 15th century parchment found in a monastery around that time, although the actual recipe itself is a closely guarded secret.

I have no wish to upset the pâtissiers or any of the other residents of the Creuse with my efforts so let me make it absolutely clear that this is not a Gâteau Creusois, it just happens to be rather like one. Let’s think of it instead as my tribute to that fine region and as a delicious hazelnut cake.
Gateau Creusois or Maybe Not
In the Creuse the gâteau (whatever it’s called) is most often eaten cold as a dessert with crème anglaise or crème fraîche and it’s truly delicious that way. On the other hand, if you want to break with tradition, try making a syrup of equal parts water and sugar, boiled together for a minute or two. Take the syrup off the heat and add a very generous glug of Frangelico liqueur. Once cool, make a few small holes in the top of the cake with a knifepoint and soak it with the syrup. That's what I did and it made the cake sink a little in the middle (a bit like the Creuse) but, in my opinion, it makes an even nicer dessert.

210 g caster sugar
110 g plain flour
110 g ground hazelnuts
120 g butter, softened
1 whole egg
2 egg whites

Grease and line a 23 cm cake tin – a springform tin is probably best, if you have one. (You could use a smaller tin if you want a thicker, more British-looking cake, but I think the thinner gâteau is nicer as a dessert). Preheat the oven to 160°C.

Mix together the sugar, flour and hazelnuts. Thoroughly beat in the softened butter followed by the whole egg.

Whisk the 2 egg whites to the firm peak stage and stir about a third of them into the mixture to loosen it. Gently, but thoroughly, fold in the remaining egg white. Put into the prepared cake tin and level the top. Bake for around 30 minutes (but check after 25 minutes). When the point of a knife or skewer comes out clean, the cake is ready.

Cool in the tin for 10 minutes or so before turning out onto a wire rack to cool completely. Soak with a Frangelico-laced syrup, if you’re so inclined (and I'd certainly recommend it).
Gateau Creusois or Maybe Not

Wednesday, 13 February 2013

Country Captain – An Almost Lost Random Recipe

This month Dom of Belleau Kitchen is celebrating the start of the third year of his Random Recipe challenge and has graciously allowed us to select a recipe from our books in any way we choose. As an old hand at this particular challenge I thought that this would be a good opportunity to try some of the books that don’t make the usual selection list.

I decided that the biggest challenge would be to select from the ‘lost’ books. ‘Lost’ in the sense that I did own these books once upon a time but now I have only a few recipes left. A couple of books suffered regrettable kitchen accidents while others haven’t survived house moves or have been loaned out and never returned. I missed these books enough to get photocopies or make notes of some of my favourite recipes from borrowed copies. So with a quick random grab from the pile of scraps I came up with a recipe for Country Captain.

I copied this recipe from a book of British cookery that I had around 1980. (It was last seen somewhere in Tooting at about the time Ultravox released ‘Vienna’). I think it's a fairly accurate transcript of the recipe, although I suspect that I may have lowered the fat content and I have used a convenient can of coconut milk rather than the coconut cream block specified in the original. It's a deeply old-fashioned dish that I think is pretty typical of the sort of recipe that turned up frequently in the 1970s.

I seem to remember the book saying that this dish had its origins during the Raj when British army captains stationed in the Indian countryside would have their cooks prepare mildly curried dishes suitable for Western tastes. This is almost certainly nonsense. Country Captain in one form or another turns up much more frequently in the US than the UK and was probably bought back from India to the US by the captains of trading vessels known as ‘country ships’. Whatever the truth of it, I haven’t made this simple dish for years and I must admit that I enjoyed cooking and eating it a lot. This will serve 4 people, although it’s remarkably easy to eat more  than your fair share.

At this point, I should tell you what the book was called. Sadly, I don’t seem to have written that down anywhere and with the passing of more than 30 years and the consumption of a fair amount of red wine I really can’t remember. If anyone has any idea, I'd love to know.
Country Captain
1 large onion, finely sliced
2 cloves garlic, finely chopped
500 g chicken thighs, boned and skinned
400 ml tin coconut milk (reduced fat will work, if you’re being careful)
3 or 4 carrots
2 tbsp smooth mango chutney
1 tbsp sultanas
1 tbsp lime juice

For the spice mix:
     1 tsp ground coriander
     1 tsp ground cumin
     1 tsp ground turmeric
     ½ tsp chilli flakes
     ¼ tsp black pepper
     A generous pinch of ground ginger

Start the onion frying gently in a little oil. After about five minutes add the garlic and the spice mix. Fry briefly then add 300 ml of water. Bring to a simmer, stirring, and let the mixture bubble away gently until most, but not quite all, of the water has evaporated.

Cut each of the chicken thighs in two. Add the chicken pieces to the onion and spice mix and stir them around for a minute or two. Pour in the coconut milk, bring to a simmer, stirring, and allow the mixture to blip away gently for 20 – 30 minutes until the chicken is tender. If the mixture starts to dry out, then cover the pan.

Meanwhile, peel the carrots and cut into smallish chunks. Steam or boil the carrots until just tender. Stir in the cooked carrots, the mango chutney, the sultanas and the lime juice. Season with a little salt. (Although, it’s not in the original recipe, I added a few sliced and cooked mushrooms as well, just because I happened to have some). Return the mixture to a simmer briefly, sprinkle on some fresh coriander if you have any and serve with rice and a selection of chutneys.

Monday, 4 February 2013

Palestine Soup

Palestine soup has nothing whatever to do with Palestine. It seems to have been given that name because it’s made with Jerusalem artichokes. Jerusalem artichokes have nothing whatever to do with Jerusalem and aren't artichokes. Anything that odd just has to be good. In fact, it’s one of my favourite vegetable soups and it so happens that it’s also very easy to make and, thankfully, low in fat.

I first came across Palestine soup in cookery books dating back to the early 1900s, but I think the dish is a fair bit older than that. Most recipes combine the Jerusalem artichokes with turnips or potatoes, which maintain the creamy white colour of the finished soup. I like to add carrot, which provides a nice touch of sweetness but does change the colour. (Unless you can find a heritage variety of white carrot).

A few years ago, Mark Hix published a Palestine soup recipe with some hazelnuts added, inspired by Auguste Escoffier’s ‘Purée de Topinambour’. The hazelnuts enhance the flavour of the Jerusalem artichokes beautifully, so I've borrowed that idea. Clearly Escoffier knew what he was talking about – as does Mark Hix, of course.
Palestine Soup
This will make 3 hearty lunch portions or will serve 4 to 6 as a starter.

½ onion, finely chopped
2 carrots, medium-sized
1 heaped tbsp uncooked basmati or long grain rice
300 ml vegetable stock
150 ml milk (semi-skimmed is fine)
300 g Jerusalem artichokes, prepared weight
Small handful of shelled hazelnuts
A little lemon juice

Add a small amount of oil to a pan and cook the onion gently for at least five minutes until it starts to soften without colouring. Meanwhile, peel and slice the carrots finely. Add the carrot and rice to the pan and pour over the stock and milk. Cover the pan, bring to a simmer and let it gently bubble away for 20 minutes.

Meanwhile, peel and slice the Jerusalem artichokes quite finely. Place the slices into water with a little lemon juice added to prevent discolouration. At the end of 20 minutes simmering, add the Jerusalem artichokes to the pan, season with a little salt and pepper (white pepper is best to maintain the colour), cover the pan again and bring back to a simmer. Keep the pot simmering for another 10 – 15 minutes or until the carrots and artichokes are tender.

Meanwhile, lightly toast the hazelnuts. You can do this in a dry pan over a low heat or simply place them in a medium oven for 4 or 5 minutes. Be careful to avoid burning them.

Remove the pan from the heat and allow the mixture to cool a little. Add the toasted hazelnuts and liquidise. If you're being very fussy, you can pass the soup through a fine sieve, but I don't usually get that fussy.

Adjust the seasoning and add a dash of lemon juice if it needs it. Croutons are good with this soup, if you fancy them, and a sprinkling of parsley does no harm either. Many recipes finish this soup by adding cream. That does give it a touch of luxury, but I really don't think the soup needs it and I prefer to keep it low in fat.
Jerusalem Artichoke Plants
By the way, Jerusalem artichoke plants are rather like spindly, slightly unsuccessful sunflowers. They’re easy to grow but, since the plants can be very large (10 – 15 feet tall is not unusual), you’ll need a fair bit of space.